

 MGBGTV8 restoration time David Smith launched a thread on the V8 Bulletin Board on 29th March 2020 at the start of his restoration of an MGBGTV8. He said in his first post that he was "documenting the progress on his blog site" and gave the link to his blog. Over the last four years David has posted further updates. V8BB thread Alongside are links to the major sections of the blog with his reports of the progress on the restoration work. Link to David's MGBGTV8 restoration blog Upated: 250918 |
Progress
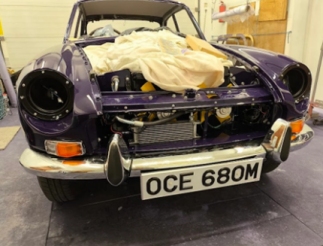
reports on the restoration blog MGBGTV8 1973 The next project David Smith had in the pipeline was an MGBGTV8 in Aconite with Autumn Leaf internal trim, but he felt it was not the best combination colour but it was a genuine 55,000 odd mile car. He mentioned on his blog that "it would be going to be a seller, as I felt I could not keep it as much as I might want to, so it would have to go at the end. But it will be a total restoration, bare metal rotisserie jobbie, complete nut and bolt as soon as another restoration of a GT6 is finished. The chap that owned it before was in the Army, bought it in the 1980s as a runner, stripped it and started the restoration and then as happens so often it got left under a cover and became too much. The issue is now, keep it totally original with the Aconite paint and Autumn Leaf interior and cloth seats. It even still has the OE cast iron exhaust manifolds and full lobster clam inlet with the tin work in fantastic condition. OE does appeal to many. But the colour combo, although as it left the Factory was probably not the most popular, so do I paint it and trim it so that it has the most appeal, keeping it V8 colour spec but not as it left the Factory or should I keep it totally as OE spec as it ran off the production line - that’s the dilemma? See the first report - MGBGTV8 1973 MG Body and Paintwork David says on his blog "So I had to start somewhere, not sure where really, so I decided to tackle the bits and repairs that had been carried out before that I wasn’t quite sure about. I haven’t bothered to show all the stripping photos as they are about as exciting as watching day time TV. However I took many as this car was an original and it had never been apart in its life. So when it goes back together and you get the usual “it wasn’t like that from the Factory” I can produce the photos as this one left the Factory, not that it really matters". "The chap that had started the repairs had done a good job but one thing that didn’t seem right was the sill to door alignment; gap was tapered and just too tight. The castle, inner etc. had all been replaced but as this was going to be a nut and bolt resto it had to be right now, so the new sill had to come off. I also wanted to see what sort of protection was on the insides. The back end to the sill was a bit tatty so it gave me a chance to tidy it up, even though it will be hidden behind the outer sill. The protection he had done was great; however I gave it all another coat of epoxy sealer and then some weld thru zinc primer on the welding faces, as a token gesture". See the second report - MG Body and Paintwork MG Fitting-up and Finishing "First few bits go on. The alloy bits have been vapour blasted, I built a vapour blasting cabinet last year and the alloy bits will all get this treatment. The relays have been stripped and re-plated along with the oil pressure gauge pipe, I could have bought new but this will keep the car almost OE and as it left the Factory. There will be additional relays for lighting etc but these will be incorporated into the loom and hidden from main view, this will be covered in the fit-up later. Radiator fan motor brackets, horn brackets etc and all of the small items have all been plated to add to the protection and finish of all the painted items. See the third report - MG Fitting-up and Finishing MG Mechanical and Engine Finally it was time for the grubby bits. Any bits there were going to be reused were degreased, wire brushed, shot blast cleaned and generally taken back to bare metal. Some were treated with a phosphate coating prior to all being treated to a coat of epoxy sealer. Even the new items were keyed and epoxy painted first. Some items were perfectly salvageable and could be reused but were pitted and in need of a bit of poly spray filler, some will say not worth it, but just makes that bit of difference, and makes it easier to keep clean". See fourth report - MG Mechanical and Engine Project completed Following the completion of the project David Smith sold the car to Tom Fallon who had been searching for an MGBGTV8 for some time and found this recently restored example in the attractive Aconite colour. Tom says "the car arrived this morning on a trailer. I've driven about 60 miles in segments to check everything out. I absolutely love it, the sound of the engine is intoxicating." He took the car to the MG North Fest meeting at Croft in September 2025 and it was on display there as a beautiful example of the model. Link |
|