384
How
to grease your gear lever and remote
Steve Newton describes how the grease the gear lever cup on the remote on an LT77
or R380 gearbox fitted to an RV8 and to many MGBV8 conversions. Access is tight
and particular care needs to be taken with a spring loaded nylon plunger which
holds the gear lever both when removing it and when replacing the gear lever -
if you are not careful it can fly off and then you will need to spend time scrabbling
around under the car hunting for the spring and plunger! Steve says "let's
begin". (Nov 13)
Pull the leather arm
rest clear of the four pads which reveals the black volumetric alarm unit mounted
on a cream coloured moulded panel. Disconnect the plug from the volumetric unit
and then loosen the four cross head screws which secure the moulded panel.
Unscrew
the gear knob from the gear lever and then as you lift up the centre console and
place it to one side, be aware of the remote alarm aerial cable which should be
taped to the underside of it - just pull it free and re-tape it back in position
later.
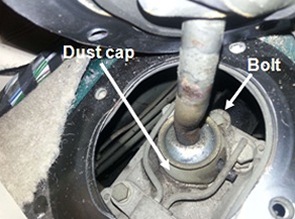
Now remove the four screws holding down the rubber gear lever
gaiter metal clamping ring and pull it upwards out of the way. The exposed carpet
is eased to the side. Now remove the bolt holding down the bracket on the side
of the dust cover cap - you may find at this stage that the bracket has broken
so you will either need to replace it or repair it. You can see above that the
access to carry out this service work is very restricted and tight.
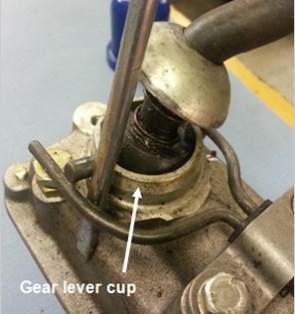
Take
a flat bladed screwdriver or pry bar and lever the bias spring arms from over
the gear lever cross pins (see left) on both sides so each spring arm is then
below the cross pins (see below). The bias spring ensures the resting place for
the gear lever when out of gear is in line with gears 3 and 4. The cross pins
are part of the gear lever ball.
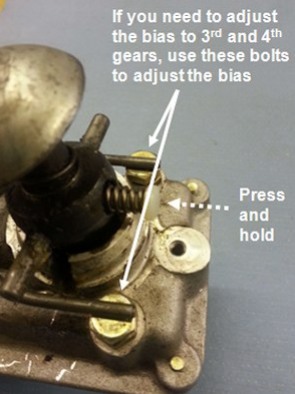
Now the gear lever is very nearly ready
to be withdrawn from the cup but first be aware that the nylon plunger and anti-rattle
spring will fly out and could be lost easily. I overcome this by using a screwdriver
or pry bar again to try and press and hold the spring loaded nylon plunger in
place when I pull the gear lever upwards and out of the remote casting. If you
have been able to keep the plunger in place then now is the time to pat yourself
on the back. Well done! Grovelling around the garage floor looking for them if
they have shot off is not much fun.
Looking into the centre of the ball
at the bottom, it's like a rose joint. Clean off the old grease from the gear
lever and remote casting. When all is clean it's time to re-grease them both with
a multipurpose grease (for example Castrol LM or other general purpose grease)
including the selector rod yoke ball which you can see when you look down into
the remote casting. With road dust flying about you can see how vital it is to
keep these parts well greased, including the dust cap too. Also do not forget
to grease the nylon plunger and spring as this will help hold the plunger in place
when you refit it.
Now is the time for the hard bit - reassembly.
This could go right the first time or you could still be there for an hour or
two wishing you had not started the job in the first place! Position the gear
lever into the casting with the nylon plunger and spring facing the rear of the
car. Then depress the nylon plunger against the spring pressure and maintain that
pressure using a screwdriver or pry bar whilst at the same time pushing the gear
lever down until it is fully home in the remote casting.
Next take your
screwdriver or pry bar and lever the bias spring back into place on top of the
gear lever cross pin arms on both sides. Make sure you have greased the spherical
washer above the spring on the gear lever shaft, then press the gear lever dust
cap down on to it and into place. Refit the single bolt |
Access
to carry out this service work is very restricted and tight.
through
the bracket flange and tighten. Replace the metal ring securing the gear lever
gaiter.
Now it's time to refit the trim. Lower the centre console on to
the gear lever and re-tape the aerial wire back on the underside of the console.
Push the cable for the volumetric sensor back through the hole and reconnect the
plug. Then screw the gear knob back on the gear stick and refit the six cross
head screws. Don't forget the two larger screws go to the rear of the console.
Refit the trim pad below the radio and then the arm rest panel and arm rest.
Remove
all tools and clean up. Bingo you have finished - time to go and treat yourself
to a hard earned cup of tea, put your feet up and think about the next job that
has to be done.
See our detailed illustrated note. More |

